Wood Inlay & Marquetry

Click to watch and learn more
Have you ever thought about incorporating laser-cutting into your work but worried that the perfection of a laser-cut edge would clash with the "imperfection" of your hand-cut edge?
While the dynamic play between these kinds of edges can be visually beneficial, I agree that the conspicuous perfection of the laser-cut edge is an important aesthetic consideration when integrating it into a hand-crafted object or image.
My approach to laser cutting usually falls on the side of the laser cutter acting in service to the hand instead of as a replacement. This is why I am so enthusiastic about making studio visits; for by learning about their processes, I can help artists develop innovative solutions that preserve the integrity of the hand.
In this post I will share with you how laser-cutting an inlay for a nineteenth-century piano stool designed by Alma-Tadema led me to visit woodworker Silas Kopf, where I gained a greater understanding of traditional inlay and marquetry.
For those of you who were like me and don't know the difference between inlay and marquetry: in marquetry pieces of wood veneer are applied to the surface of an object, such as a table top, while in inlay they are set into a depression (above).
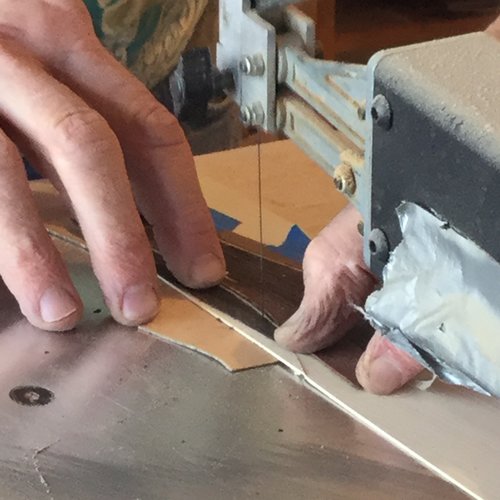
Watch Silas Kopf demonstrate his approach to marquetry.

Photo: Clark Art Institute
First Stop
While I grew up building things in my father's workshop, I hadn't fully considered how laser-cutting could be applied to areas such as conservation until Hugh Glover, furniture conservator at the Williamstown Art Conservation Center (WACC), contacted me about a project he was working on.
In preparation for an upcoming exhibition at the Clark Art Institute, Hugh was restoring a pair of ornate nineteenth-century piano stools whose monograms had been pried out by a previous owner. The intricate cutting was perfectly suited for the laser cutter.


Part of what excited me about this project, other than working at a scale so small I needed tweezers, was how it gave me an opportunity to learn about another art form, inlay and marquetry. I find that I particularly enjoy working with artists and artisans who are experts in niche fields because it sparks my curiosity and informs my approach to working with artists in other disciplines.
See the restored stools at the Clark Art Institute, Williamstown, Massachusetts.

Meet Silas Kopf
To learn more about traditional marquetry I visited a master of trompe-l'oeil marquetry, Silas Kopf, who generously demonstrated his technique at his workshop in Easthampton, Massachusetts. Missed the video above of Silas working? Watch it here.
Silas seamlessly fits the pieces of wood veneer together by cutting them simultaneously on an angle, thus creating wedges allowing the top and bottom pieces to interlock.
What was so striking to me as I watched Silas work was how his approach to cutting was more like drawing. While he transfers a drawing of an image onto the wood, he allows the feeling of the saw blade moving through the wood to organically shape the line.
The inability to respond directly to a cut line is one of the challenges of laser cutting. I have developed ways of infusing spontaneity into the digital predictability of laser cutting, but that is for another post.
How does it work?
Silas's technique of angling the jigsaw bed to create interlocking shapes reminded me of how I had used the angle of the laser cut edge to create a close fit for the monogram.
One thing you will notice when laser cutting through thick material is that the edge is slightly angled. This happens because the heat of the laser decreases as it cuts through the material, vaporizing less material the deeper it goes. While there are ways to minimize this angle, it is advantageous for inlay and marquetry.
For the monogram, I alternated the side of the material that was facing up. For the pear-wood outline, the good side was placed face down, so the thinner edge would fit into the engraved juniper. The boxwood was cut face-up to interlock with the pear-wood.
Want to learn more?
Sign up for Adventures in Laser Cutting, my newsletter on laser cutting, the arts, and other fun stuff, just because.
I promise you'll never be inundated with e-mail. I'm too busy laser cutting!

